Showing posts with label anti-stress. Show all posts

October 25, 2017

Waste Free Homemade Popcorn for Movie Nights with a film review from "The inner Circle"

I am very honoured that Michael asked me to pair up with him & the Cheetah for his 100th Film review on the Inner Circle. He is reviewing a real popcorn movie,  a family friendly Hallmark mystery movie that I watched last night on his and Paladins recommendation and I can only agree with them! They reviewed the first mystery of the Aurora Teagarden Mysteries "A bone to pick". Michael & Paladins reviews are non sponsored so you can be sure to get their honest opinion! Michael is very resourceful in finding DVDs on sale ( I read somewhere he never spends more than 1,50$ for a movie). He then puts down 3 dvds on the carpet and lets his ginger cat Paladin, with the personality of a cheetah pick the movie. The movie Paladin sniffs at first is the pick for the next review. So go make yourself some popcorn and enjoy the movie recommended.

homemade lightly buttered popcorn with a roasted walnuts, dark chocolate and a hint of salt


August 19, 2017

Boost Your Spirits and Immune System with a Blackberry Banana Smoothie

My boys are currently suffering head colds, and while fruit normally disappears into their little mouths faster than you can cut it up, it can be hard enough to get some vitamins into them when they need them most. I usually turn them into smoothies together with a natural yoghurt fill it into a boy approved cup add a reusable straw and voila: even little boys will drink a purple vitamin booster when they aren't feeling so well!

June 26, 2017

Banana Hazelnut Smoothy - another tasty and fast way to use up those overripe bananas


banana hazelnut smoothy, great use for overripe bananas

This is a smoothy my kids and I currently are somewhat addicted to. It is also a great way of using up those overripe bananas.

April 08, 2017

Banana Chocolate Waffles - a good & fast way to use up those giraffe coloured overripe bananas


Are You guilty of collecting some of those ripe bananas and then let them end unused in the compost?


Well, join to the club! I decided I need to fight this wasting! So from now on I will come up with uses!
Here is my first experiment. As so often it involves the waffle iron!

February 21, 2017

Roasted Hazelnut Chocolate Brownies - A gluten free taste bud explosion!


You can make these very tasty brownies out of any left over nut meal from making nut milk. You can also just use any ground nuts or nut flour, if you have no left over nut meal in your freezer.  These roasted hazelnut chocolate brownies were made out of the roasted hazelnut meal from last weeks roasted hazelnut milk post. They are incredibly moist and rich in taste. Roasting the hazelnuts really adds the extra bit of flavour to these little taste bombs.


Here is the very simple recipe:

Melt 70 grams butter in a saucepan
and add 150 grams of chocolate (I use a mix of 70% and 85% dark chocolate) and stir until melted
add 150 grams of brown raw sugar
and 6 eggs one ofter the other, while risking on high speed for a while after each
and add 2 tablespoons of vanilla extract (find out here how to make your own) Whisk all well
Now gently fold 200 grams of defrosted roasted hazelnut meal (you can add any nut meal here, we have also tried almonds or cashews. Both make very tasty Brownies!) Here you find out how to make your own. You can also use 200 grams of very finely ground hazelnuts (or really any nuts to make a different brownie) if you have no nut meal in your freezer. Be aware if you take ordinary ground (hazel)nuts your brownies will be a little less moist!  Once all is a homogeneous mass pour it into your buttered baking dish (I use a 23cm/9 inch square silicon form that is 4,5 cm in hight)  Now bake in preheated oven at 180C/360F for 15-20 minutes. You don't want to over bake them, rather still have them a little moist instead of bone dry....they should be just about baked.

Enjoy!


February 02, 2017

A Carpet that tells a story of family and love

You know that stack of onesies, baby clothes, kids clothes, grown-up T-shirts and pyjama trousers and anything else made of cotton jersey that you didn't have the heart to get rid of? Well how about you cut them into stripes and crochet a carpet for your cosy home? It will make a carpet filled with memories that you and your family made....I just love the sentiment of it!  You save hundreds of Euros and it won't be riddled with chemicals and their fumes. With this carpet you won't have to air for weeks before you can enter the room again without getting a headache...


I started making this carpet nearly 2 years ago and it took me about 3 months. Most of this time was spent cutting the material and turn it into balls of jersey yarn. Be warned, it ´s a dusty & fluffy work!  You shouldn't be wearing anything black and then need to rush out while you are rolling up the cut T-Shirt yarn!


What you need:
12mm crochet hook
A lot of old clothes made from jersey (baby onesies, PJ´s, T-shirts, leggings, long johns, vests......the list is near endless....)
A very sharp scissors (otherwise you will go nuts!) A cutting mat and a rotary cutter should work, too.
Basic crochet skills


Start by cutting the jersey cotton into stripes. There are plenty tutorials on You-Tube that explain how to cut up a  T-shirt pretty fast. To a certain point this will work for leggings and PJ bottoms, too. All T-shirt tutorials stop under the armpits and waste the rest, I just kept cutting in a never ending way till the whole shirt ( including Sleeves!) Was turned into one string! The only things discarded were the very thick collars.
The stripes should have a width of roughly 3,5 cm. They do not need to be exact or straight, as the yarn will roll in its sides and you won't notice any errors. Just make sure you do not get too thin as that would tear eventually.


When rolling up the yarn, pull it through your fingers with a little force, the sides will roll in and it will be easier to crochet. Now get started! Make a slip knot. Next, make as many chain stitches until you have roughly 2/3 of the width of your carpet. It will get a good bit wider after adding rows. I had to unravel my first try because it got too wide! Now all you need to do is proceed with single stitches, row after row until your carpet has reached the measurements you would like it to have! It really is this simple!


You can find Videos on You-Tube how to connect the ends of two balls of yarn without having a knot. I tried it, but went back to knots, it worked better for me. In the end I pulled all knots to the bottom side of the carpet so they wouldn't be visible. But they will come up again after a while...


Pros and Cons of a Carpet like this:

Pros: It is incredibly soft, any chemicals will have long been washed out. You will keep pointing at certain rows and say things like " Oh this was my favourite maternity top" and many others similar sentences...

Cons: Dirt falls through and gets caught in between the stitches, it is not an easy clean! Depending on the size washing is no option and it gets very heavy.


I hope you have as much fun creating a similar piece as I had!


August 11, 2016

super fast to make sugar and gelatine free healthier jelly bears for your kids or yourself


200 ml orange juice (fresh pressed is more yummy, but from the pack will do just fine)
1 teaspoon of lemon juice (again fresh juiced would be better)
1 package of agar agar/ agartine (10gr)
1-2 tablespoon Honey or any other sweetener of your choice.You could easily make them vegan with rice syrup or agave syrup. I could imagine maple syrup having a bit of a too strong taste, but I have not tried it.

Heat up juice and dissolve honey in it.
Whisk in agar agar.
Whisk until all dissolved.
pour into forms. I used silicon form. If you do so learn from my past experience and put a cutting board underneath.
Chill for about an hour and then dig in. They will be a bit glibbery to the touch, but taste awesome. Even my mom who despises anything sweet, loved them and had not just one, but a few! They supposedly last a week to 10 days in the fridge but they didn't even make it to day 2 in our house as they where all gobbled up in no time.

You can make them in other colours by using different coloured juice/fruit purees. The only no go is pineapple as it won't work.

If you tried an esp. nice tasting  fruit/colour please let me know. Or if you have an idea that makes them less glibbery.

June 09, 2016

How to make an ever so cosy T-shirt scarf

I am currently going a little mad with the sewing machine. A young friend cleaned out her cupboard and gave me 4 bags full of old clothes. After that my husband and I did the same. Now my sewing niche looks like one big messy pile and I can hardly walk around the desk to get to the sewing machine. I really need a few mornings to get organised in there! Have you got any tips? What works for your sewing room? How do you organise all your materials, zips, buttons and other utensils? I would love to hear!

Anyway as I had 2 kids on the mend at home, I could only do something basic that wouldn't need too much concentration on my side. Our workshop is not exactly toddler safe, but the two guys love being down there as it is one big adventure park to them. Which also means I am in a constant high-alert-mommy-modus.

So I started this project working out how to cut up old T´s in the most efficient way to get enough stripes for a nice length scarf. I took 3 of the softest shirts and turned them into scarfs. Two of them I made as presents and one is for myself.

My next planned project is making hats for the boys out of old T-shirts. I have a basic plan in my head, I will just have to figure out how to get it out of there.

As for those scarfs...let me introduce ROARY to you. He kindly volunteered to be my model as I am a little camera shy due to some childhood trauma involving my dad and his very trigger-happy finger. ROARY is my boys piggy-bank dragon. He also thought my youngest walking, by holding on tightly to him while being pushed round after round through our living room. I am just mentioning this, so you know this guy is not just someone random, but has become a well established member of our little family.


My first attempt was a birthday present for my mum. And I tried the lazy way using the sides of a T-shirt to save myself a few seams. I used an XL shirt.


So here is what I did: First I made a straight line from the shoulder line down to the bottom of the shirt.


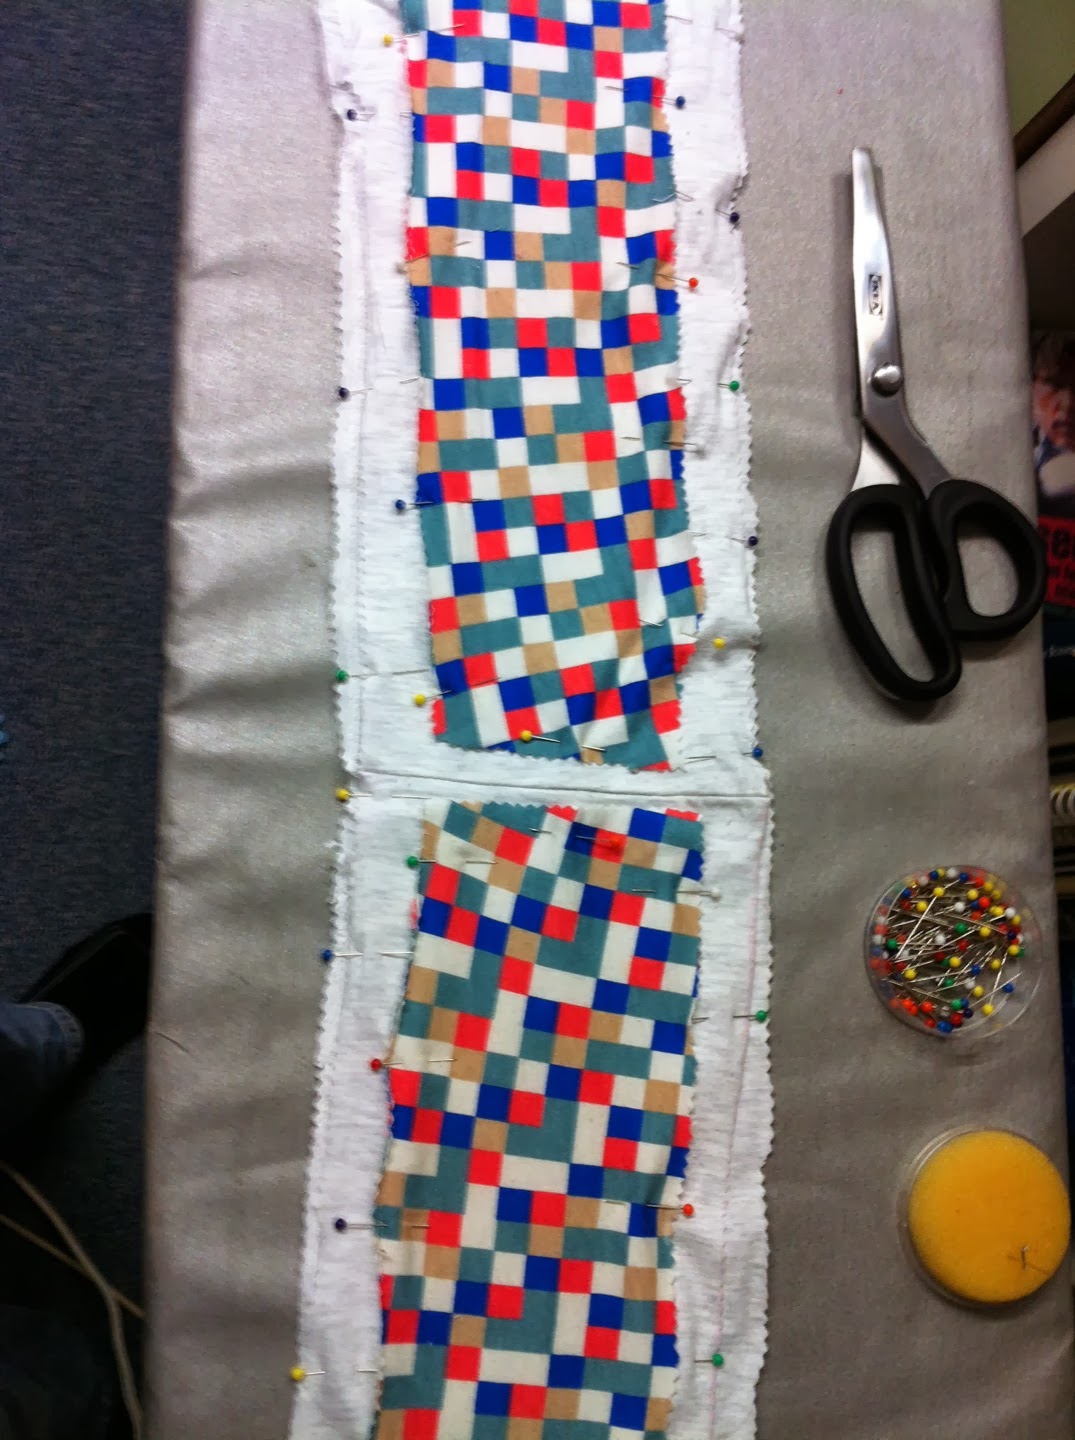
Then I cut it (front and back at same time). First along my pink line, then I opened the sides. Here I used a zick-zack scissors. I first thought it would make it look nicer and wouldn't frazzle. But later I cut them off and made them straight. I prefer the straight look, I think. But what you use is entirely up to you.  Once you unfold front from back you have one long stripe. You do the same with the other shoulder part of the T-shirt.

When you reach the sleeve while cutting the sides open, just cut along the seam very closely, for now it doesn't matter if there is a little seam left on your scarf side of the material, as you will later have to straighten the sides anyway. I also had a little of the print left on one side, as you can see in the left middle of the picture below. That two will fall away later when you clean the sides. So don't worry too much about these things when getting started.

Now before you pin your two parts together consider this: If you leave the seam at the shoulder bits, your scarf will be slightly curved, which looks a bit unusual when you hold the scarf in your hands, but if you fold it the right way around your neck it fits perfectly. But you can open the seams, straighten the material and sew them together straight if that is what you prefer or you can follow the second tutorial that will follow later and leads to the scarf ROARY is wearing in the first picture. 

Now take your two parts and pin them together. Right side should show outside on both sides! We will leave the sides raw.  You should try to put them together that printed parts you want to cut away stick out on that side, same for seams left from sleeves. It sounds more complicated than it is. 


Next step would be to check your scraps for a wee bit of colour to add. I decided that this one includes all the colours my mother has in her cupboard and gives her lots to mix and match. I made the scarf for her as a cosy one to wear when walking the dog, nothing fancy. And her Raincoat is black. So it is very easy to match something to it. 


Now I had come up with two possibilities for decorating this little present. I tried them both, but couldn't make up my mind. So I asked my sisters and some friends and took votes. I first thought that the material might be a little loud and I should only use it in small doses, esp. considering I was sewing this for an mid sixties lady. 

So this was my first design. It got one vote out of eight.


This one got 7 votes.  I would love your input! Which design would you have gone for?


And I got one voter saying I should not use this material unless I was sewing a clowns costume. My hardest and most honest critic went for the last version, so this was another reason why I went for the "louder" version.


Now that I had pinned down my design I just sewed all the bits together and then cut both sides straight which also removed the printed bit, and the little bit of seam from the sleeves.


While this is the fastest method, it will not give you the longest scarf. but it will be very cosy anyway!


September 16, 2013

Gluten-free Peanutbutter-Nutella-Double-Choc-Chip Cookies

There are quiet a few recipes floating the net for PB-Cookies without flour. Some have bananas in them. Some just lots of sugar and PB. All the recipes looked so strange to me. And I could not understand how this dough would actually form into a cookie later...So I had to give it a try! Now it actually makes sense. You can use almond or coconut flour as a flour substitute, so why not peanuts?


Sorry for the bad quality of all the pictures, but this 85% dark chocolate really screws them up.  They either look burned w/o flash (which they aren't) or well like the above if I use flash.. :-/

I have quite a number of coeliacs in my family and a PB addicted father, so next time I am home I am going to treat my family to these!

I didnt have that much PB left so I created my own and came up with this:

Add all the following in a bowl and mix well:

1/2 cup smooth PB (good quality)
1/4 cup crunchy PB (good quality)
1/3 cup Nutella
1 cup brown sugar
1 TABLESPOON Vanilla extract (jip you read right! since I started making my own I go big, because I just love the taste so much )
1 pinch of salt (depending on how salty your PB is)

then gently fold

110 gr 85% choc chips
80 gr. dairy choc chips

into the dough


refrigerate for at least 1,5h or over night

form little balls out of approximately 2-2,5 tbsp. of dough, put on plate and back into fridge.
preheat oven: 175C/350F once oven is hot (10-15 min) take your plate out of fridge, place balls quickly on backing paper or silicone sheet, stick in oven and bake for approximately 7-10 min.


once you take them out, they look very soft and are pretty fragile, just leave them on sheet for 10-15 min to set and cool, then shift them carefully onto a cooling reck.


I took 85% dark choc. While I love it, it might be a bit bitter for some. Even though there is a whole cup of sugar in these they actually are not very sweet. I can see them taste very well with just dairy choc or white choc, too! Oh and maybe a white chocolate and cranberry....hmmm I think they are next!!

If you eat them after just a small cooling period, they are lovely and gooey, the longer you keep them the firmer they get...over all they are very yummy and got a five star rating in this house!

I also made a cookie sandwich with Ben and Jerry´s Strawberry cheesecake...OMG just do it! Go treat yourself! Unfortunately it was gone before I thought of making a photo :-P

I hope you enjoy them as much as we did!


August 13, 2013

Iced PB-Banana Bites


These are very simple to make and kids love them. Well not just kids.... We made them for my sons Birthday party.
Slice 2 Bananas in about 3-4mm thick slices. Take a little spoon or spatula and add a wee scoop of peanut butter on half of them, top them with other half and put in freezer for at least 45 min. in the mean time melt choc of your liking roughly 150-200gr. I made them with a lactose free milk choc and some 85% dark chocolate. Once your freezing time is up, get your little sandwiches out and dip them in the melted choc. I used two forks for this job and that worked pretty well. Then stick them back into freezer and try to freeze them for a few hours (or start picking away, if you are anything like me).

ENJOY!


February 25, 2011

Twix® muffins


After making these I still had seven Twix® left over. I made my Husband a choc cheese cake for valentines day, and it was a big hit around here, so I thought I could make those Twix® into something cheesy...like muffins??! There was no recipe so I came up with this one myself. I thought they turned out very yummy (had 3 for breakfast this morning, so how bad can they be?) but honestly, it depends what ratio for base to cheese you prefer. These little Babies will be about half to half.

So you take your
7 Twix® (=14 Fingers)


You have to separate the biscuit from the caramel bit with a sharp knife. Really it sounds more difficult than it is!


Then put the biscuit bits into the blender


add
1/2 cup ground almonds
3 tbsp melted butter
2 tbsp white sugar
mix well, and divide into 18 muffin cases.
preheat Oven to 150°C/300°F and bake the bases for about10 minutes. Then let cool.


Now beat in a large bowl
2 Pcks (à 8 ounces/200gr) of cream cheese (softened) until fluffy. Then add
1/2 cup of white sugar. Mix well, and add
two beaten eggswith
2 tbsp of coffee liqueur. Mix well. Chop up the caramel parts of the Twix®s and add to the Cheese.


Fill on top of your cooled base in the muffin cases and put back into the oven at 175°C/350°F for roughly 30 min. The edges should be light brown.


I hope You enjoy them as much as I did :-)


February 18, 2011

Yummy Twix® - Cookies


I looooooove baking. It is THE most effective way for me to clear my head, plus usually I enjoy eating the outcome. So when I came across this post, I just knew I had to give these little calorie bombs a try.
I varied the recipe a little though as my baking soda was a bit out of date and I didn't want to waste an egg white. And these turned out great, soft on the inside, and a bit chewy with the biscuit chunks from the Twix®.

2 cups plain flour
1/2 tsp. soda
1/2 tsp baking powder
1/2tsp. salt
Sieve all into bowl and set aside.
 
chop up
7 Twix® (= 14 Fingers, just so there is no misunderstanding)
first length wise, then into small chunks, as seen in picture below.


don't bother saving all the little biscuit-crumbs (I made sure there wasn't much chocolate in with the crumbs and fed them to our dog ;-) )
set the chuncks aside

now melt about
125 gr of butter
let it cool a little and stir in
1 1/3 cups of brown sugar
3 tbsp vanilla sugar
2 tsp vanilla essence

then whisk 
2 medium sized eggs in a separate cup
and stir in with the butter-mix
now add butter mix into bowl with flour and mix well

make half hand palm sized little flat balls and leave on baking sheet. Make sure you leave enough space between each one of them. I had two sheets of cookies in the end.
 
put into preheated oven at
180°C or 325°F for 12-15 min.
don't let them get to brown around the edges


let them cool completely on tray before putting them into storage.

Or enjoy straight away with a cuppa double choc mocha.