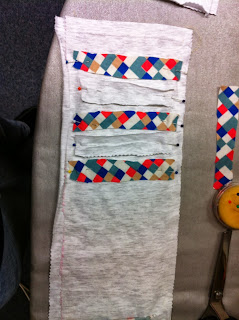
Anyway as I had 2 kids on the mend at home, I could only do something basic that wouldn't need too much concentration on my side. Our workshop is not exactly toddler safe, but the two guys love being down there as it is one big adventure park to them. Which also means I am in a constant high-alert-mommy-modus.
So I started this project working out how to cut up old T´s in the most efficient way to get enough stripes for a nice length scarf. I took 3 of the softest shirts and turned them into scarfs. Two of them I made as presents and one is for myself.
My next planned project is making hats for the boys out of old T-shirts. I have a basic plan in my head, I will just have to figure out how to get it out of there.
As for those scarfs...let me introduce ROARY to you. He kindly volunteered to be my model as I am a little camera shy due to some childhood trauma involving my dad and his very trigger-happy finger. ROARY is my boys piggy-bank dragon. He also thought my youngest walking, by holding on tightly to him while being pushed round after round through our living room. I am just mentioning this, so you know this guy is not just someone random, but has become a well established member of our little family.
My first attempt was a birthday present for my mum. And I tried the lazy way using the sides of a T-shirt to save myself a few seams. I used an XL shirt.
So here is what I did: First I made a straight line from the shoulder line down to the bottom of the shirt.
Then I cut it (front and back at same time). First along my pink line, then I opened the sides. Here I used a zick-zack scissors. I first thought it would make it look nicer and wouldn't frazzle. But later I cut them off and made them straight. I prefer the straight look, I think. But what you use is entirely up to you. Once you unfold front from back you have one long stripe. You do the same with the other shoulder part of the T-shirt.
When you reach the sleeve while cutting the sides open, just cut along the seam very closely, for now it doesn't matter if there is a little seam left on your scarf side of the material, as you will later have to straighten the sides anyway. I also had a little of the print left on one side, as you can see in the left middle of the picture below. That two will fall away later when you clean the sides. So don't worry too much about these things when getting started.
Now before you pin your two parts together consider this: If you leave the seam at the shoulder bits, your scarf will be slightly curved, which looks a bit unusual when you hold the scarf in your hands, but if you fold it the right way around your neck it fits perfectly. But you can open the seams, straighten the material and sew them together straight if that is what you prefer or you can follow the second tutorial that will follow later and leads to the scarf ROARY is wearing in the first picture.
Now take your two parts and pin them together. Right side should show outside on both sides! We will leave the sides raw. You should try to put them together that printed parts you want to cut away stick out on that side, same for seams left from sleeves. It sounds more complicated than it is.
Next step would be to check your scraps for a wee bit of colour to add. I decided that this one includes all the colours my mother has in her cupboard and gives her lots to mix and match. I made the scarf for her as a cosy one to wear when walking the dog, nothing fancy. And her Raincoat is black. So it is very easy to match something to it.
Now I had come up with two possibilities for decorating this little present. I tried them both, but couldn't make up my mind. So I asked my sisters and some friends and took votes. I first thought that the material might be a little loud and I should only use it in small doses, esp. considering I was sewing this for an mid sixties lady.
So this was my first design. It got one vote out of eight.
This one got 7 votes. I would love your input! Which design would you have gone for?
And I got one voter saying I should not use this material unless I was sewing a clowns costume. My hardest and most honest critic went for the last version, so this was another reason why I went for the "louder" version.
Now that I had pinned down my design I just sewed all the bits together and then cut both sides straight which also removed the printed bit, and the little bit of seam from the sleeves.
While this is the fastest method, it will not give you the longest scarf. but it will be very cosy anyway!


